
How I encourage retention, deep understanding, and accuracy… fast!
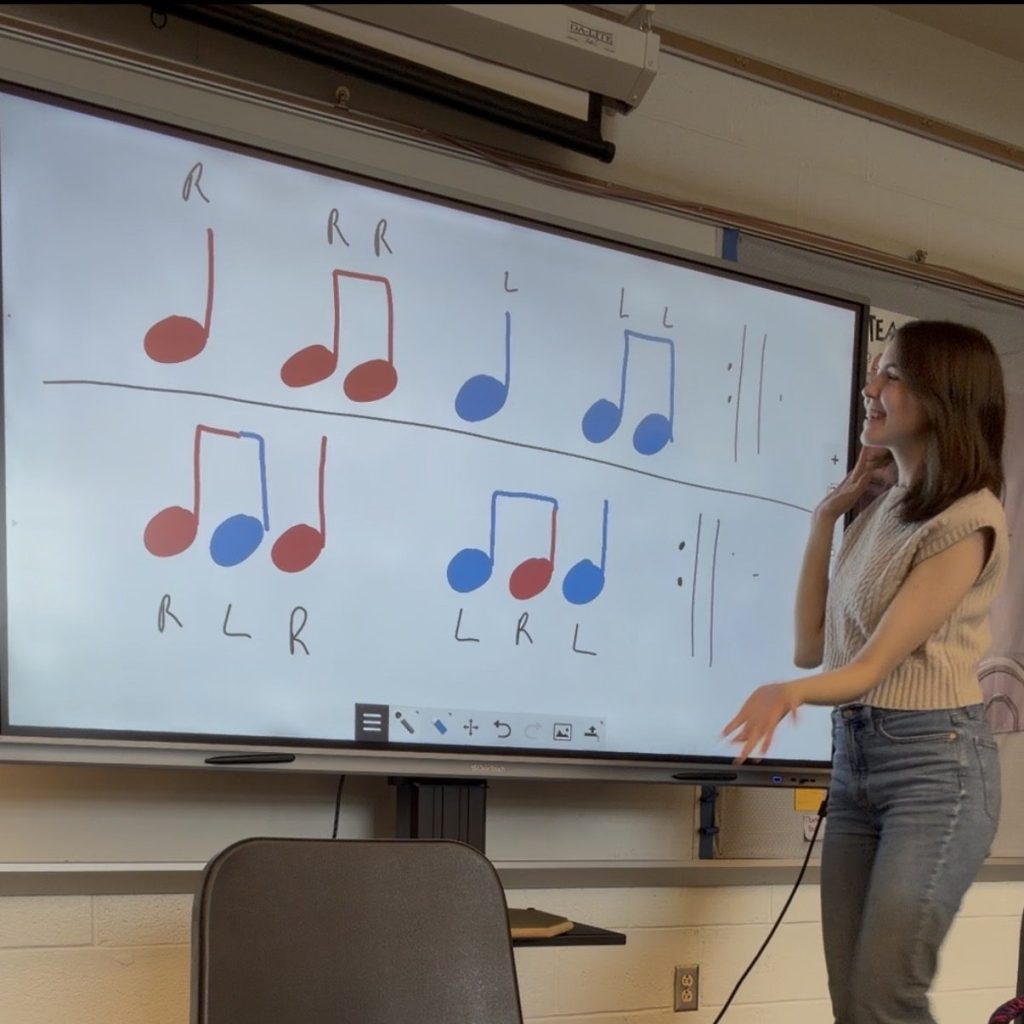
Every percussion teacher has introduced a student to their first paradiddle. While some students pick it up quick, it is a challenging transition for others. I often find that younger students encounter one of the following common misconceptions while learning this skill, including…
- Double-timing the diddle, then pausing before switching hands (i.e. Par-a-diddle…(pause)…. par-a-diddle)
- Repeating only the RLRR measure, without switching to a LRLL measure (i.e. RLRR RLRR RLRR… the opposite problem may also occur!)
- Saying the correct pattern out loud while playing the incorrect pattern
- Tensing up for the “diddle” moment
- Accenting the “odd man out” note (i.e. rLrr lRll)
While in a private lesson setting, I may have the time to make corrections based on the student’s individual learning style, group learning does not offer the same advantage. Over the summer, I utilized some strategies that helped paradiddles stick quickly and with a variety of students, including…
- Color-coded note heads (my students enjoyed red for right and blue for left)
- “Fragmenting” the paradiddle into smaller patterns they have encountered before (R_RR L_LL and RLR_ LRL_)
- Establishing related terminology (e.g. diddle and rudiment)
- Clapping the rhythm before playing to reaffirm a steady beat
- Scaffolding the lesson (music educators know this term all too well!)
Suddenly, a challenging skill becomes a fun game! I love utilizing this lesson plan with my beginner students, especially in small groups. It helps me strike a balance between managing the full class and providing individual attention to each student. It also acts as a great launching point for other rudiments and skills. Finally, in breaking down the paradiddle into its fundamental parts, I encourage the students to utilize creativity and critical thinking, making their practice sessions much more efficient.
I’ve outlined my step-by-step process below, and please feel free to download my free follow-along worksheet for you and/or your students!
Step-by-Step Paradiddle Lesson Plan
Approx. Time: 20min (but flexible)
Age Group: Elementary
Appropriate Settings: One-on-one lessons, group lessons, beginner percussion classes, “pull-out” lessons, take-home activity
Pre-requisites: Single strokes, double strokes, diddles
- Begin with light warmup (I enjoy “8 on a hand” or similar)
- If student is not already familiar, introduce the concept of rudiments
- I find it helpful to equate this to how other instruments learn scales
- Explain that these won’t only be learned in isolation, and will be later be helpful in their music!
- Introduce the paradiddle
- Play for them: slowed down and sped up
- Encourage students to say the word out loud
- Sample student questions for critical thinking:
- Why do we think it is called a paradiddle?
- When would this be helpful in our music?
- Introduce paradiddle fragments #1 and #2 from the worksheet
- Have students clap a steady beat while saying the patterns out loud
- I.e., “Par-a-did, Par-a-did,” “RLR, LRL,” etc.
- Transition the skill to the drum pad
- Have students play while repeating the patterns out loud
- Have students clap a steady beat while saying the patterns out loud
- Try the full paradiddle with color-coding!
- First, clap a steady beat while saying the pattern out loud
- Then, transition to the drum pad
- If you are in a group setting, have them repeat this on loop while you check in with individual students around the room and make minor adjustments
- Try the full paradiddle with no color-coding and no speaking!
- If time remains, introduce “challenge mode”…
- Try the paradiddle at different dynamics
- Throw in random accents
- Try speeding up & slowing down
- And more!
Did this work for you? Reach out and let me know your thoughts. I would love to hear your own favorite beginner lesson strategies as well!
 Abigail Walton | Percussion
Leave a comment